Light blue: Used for haematological tests to assess clotting, including coagulation studies (e.g. activated partial thromboplastin time (aPTT), prothrombin time (PT) and international normalised ratio (INR), D-dimer and fibrinogen. Contains sodium citrate, a reversible anticoagulant.
Gold: Used for a wide range of tests - for example in biochemistry (including urea and electrolytes, C-reactive protein, liver function tests, cardiac enzymes, lipid profile, amylase, bone profile), endocrinology (including thyroid function tests, beta-hCG), toxicology (ethanol and drug levels) and tumour markers. Contains silica, a clot activator, and a serum separator gel to separate the plasma and blood cells.
Lavender: Used for a variety of routine haematological tests, including full blood count, erythrocyte sedimentation rate (ESR), blood film and HbA1c. Contains EDTA, an anticoagulant.
Pink: Used for group and save (if there is a possibility a patient may require a transfusion) and for cross-matching (to confirm blood donor compatibility prior to transfusion). Contains EDTA, an anticoagulant.
Grey: Used for measuring glucose and lactate levels. Contains sodium fluoride (prevents glucose breakdown after taking the sample) and potassium oxalate, an anticoagulant.
Other less commonly used blood collection tubes include: red (used rarely for biochemistry tests that cannot be stored in the yellow bottle, including certain hormone, toxicology and bacterial/viral serology), green (used to measure renin and aldosterone, neutrophil function tests and cytogenetics) and dark blue (used to measure trace metals such as zinc and aluminium).
Introduction
Introduce yourself with your name and role, and confirm the patient’s name and date of birth. Explain the procedure, check the patient’s understanding and obtain consent. Wash your hands.
Ensure the patient is comfortable and check which arm they would prefer blood to be taken from. Ask the patient to expose their arm by rolling their sleeve up, if necessary.
Ask the patient if they have any allergies, specifically to latex. Also ask whether they are taking any medications, specifically anticoagulants, and if they have had any surgery recently that may affect the arm you take blood from. Check whether the patient is currently in any pain.
Equipment
Collect a plastic tray, and clean both the inside and outside of the box thoroughly with an alcohol surface disinfectant wipe. You will then need to collect:
- A pair of non-sterile gloves.
- Tourniquet.
- Alcohol swab (2% chlorhexidine in 70% alcohol).
- Gauze or cotton wool.
- Medical tape or plaster.
- Blood collection system (including winged butterfly needle and barrel).
- Blood collection tubes as required.
- Laboratory forms.
- Clear specimen bag.
Check the expiry dates of the needle, blood tubes and alcohol swab. Ensure a sharps bin is nearby.
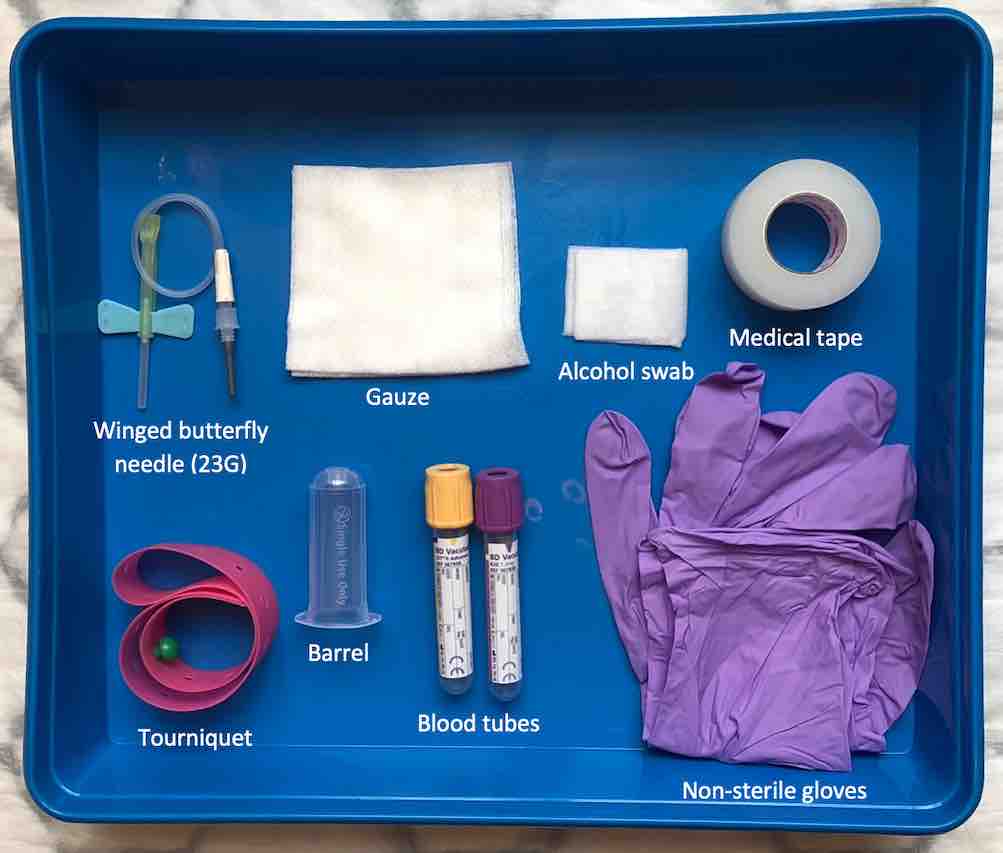
Equipment for venepuncture using a blue (23G) needle.
Vein selection
Wash or gel your hands. Place a pillow beneath the patient’s outstretched arm for support and ensure that the patient is comfortable.
Visual inspection
Inspect the patient’s arms for any cannulas, arteriovenous fistulae and areas of bruising, swelling, infection or broken skin. These areas are a contraindication to venepuncture and should be avoided. Avoid taking blood from an arm that has been affected by surgery, looking for signs of oedema and scarring, or pre-existing medical conditions, such as a stroke affecting movement of an arm.
Palpation
Apply the tourniquet to the patient’s arm around 4 fingers width above the planned venepuncture site. Palpate a suitable vein, which should feel soft and ‘bouncy’. Avoid veins that feel hard; this may be due to phlebitis. The median cubital vein in the cubital fossa is typically used for venepuncture.
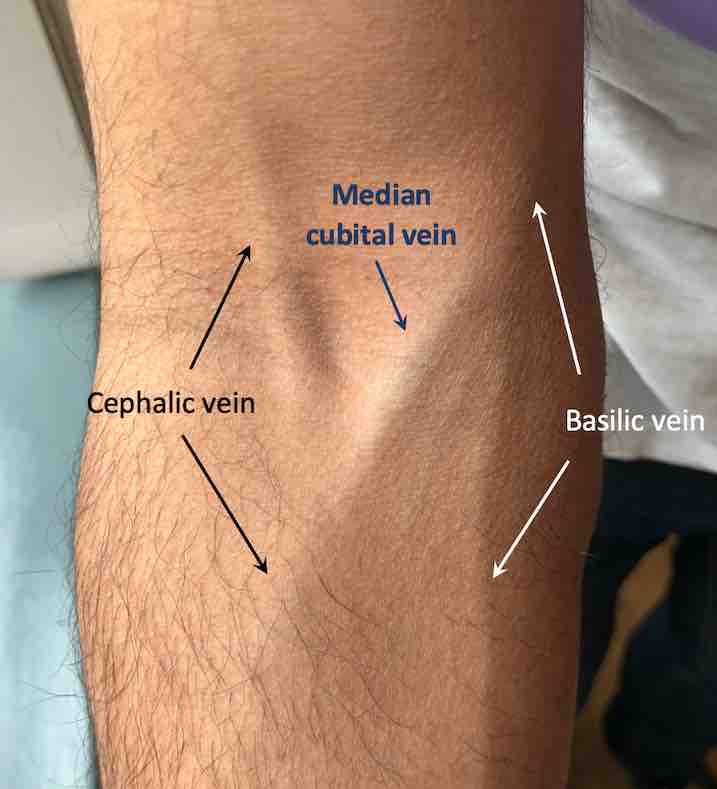
Medial cubital vein in the right cubital fossa.
Site preparation
Release the tourniquet, clean the area around the selected vein with circular motions moving from the centre outwards, then allow to dry completely for 30 seconds. It is essential that you do not re-palpate the area from this point onwards.
Needle insertion
Assemble the blood collection system by attaching the collection barrel to the needle.
Re-apply the tourniquet and put a pair of gloves on. Anchor the vein in place by gently pulling on the skin distal to the vein with the thumb of your non-dominant hand. Pick up the needle and with the bevel facing upwards, remove the cap and insert it into the selected vein at an angle of 15-30 degrees to the skin. Just before inserting the needle, warn the patient that there will be a ‘sharp scratch’.
Observe for flashback which confirms that the needle has entered the vein. Carefully lower the needle so it is flat against the skin, and hold it in place whilst you attach the blood collection tube(s) to the barrel.
Blood collection
Attach each tube in turn according to the order of draw and allow them to fill. Remove bottles from the barrel by gently twisting and applying traction, to prevent the needle from leaving the vein. Gently invert each of the blood tubes between 3-10 times, depending on the colour of the tube.
Once all the tubes are filled, release the tourniquet and then remove the needle from the vein. Apply gentle pressure over the venepuncture site for around 2 minutes with a piece of gauze or cotton wool, to prevent haematoma formation. Ask the patient to do this, if they are able to.
Dispose of the needle and barrel in a sharps bin, and dispose of non-sharp waste in the appropriate waste bin.
Inspect the venepuncture site to check that the bleeding has stopped and apply a dressing using a clean piece of cotton wool or gauze and a sterile tape strip or plaster to secure it in place.
If multiple different coloured tubes need to be filled, you must follow the order of draw to prevent cross-contamination of tube additives affecting results. This can vary according to hospital trust, but in general:
(1) Blood cultures*, (2) Light blue, (3) Red, (4) Gold:, (5) Green, (6) Purple, (7) Pink, (8) dark blue, (9) Grey
If you are using a winged butterly needle and are starting with the light blue tube, you may wish to bring a second bottle, as it is unlikely that the first will fill completely as due to trapped air. If the tube is underfilled the sample cannot be processed. The amount of sodium citrate in the tube is measured for a certain volume of blood
*Blood cultures will soon be covered in its own page.
Following blood collection, tubes need inverting to mix the blood with the additive. This should be done gently to prevent haemolysis of the sample:
- Light blue:Invert 3-4 times
- Red:Invert 5 times
- Gold: Invert 5 times
- Green: Invert 8-10 times
- Purple: Invert 8-10 times
- Pink: Invert 8-10 times
- Dark blue: Invert 8-10 times
- Grey: Invert 8-10 times
Completion
Check the patient feels comfortable and advise them to keep the dressing on for at least 30 minutes. Advise against heavy lifting or excessive strain in the arm, and to seek medical assistance if the venepuncture site becomes painful, red or swollen. Thank the patient.
Remove your gloves and wash your hands. Fill in the patient’s details on each of the blood bottles and complete the laboratory form. Seal the blood bottles and laboratory forms in the clear specimen bag, ready for collection.