This page will cover intramuscular, subcutaneous and intradermal injections. The preparatory phase is similar, with the key differences being in the administration itself.
Introduction
Introduce yourself, and confirm the patient’s name and date of birth. Double check that the prescription for their medication matches with their identity. Explain the procedure, check the patient’s understanding and gain consent. Wash your hands.
Ask the patient if they are in any pain and are comfortable. Check for any allergies to medications and to latex. Ask the patient if they have a preferred site for the injection
As a medical student, you should always cross-check the medication and any diluents with an appropriately qualified colleague.
An injection can occasionally be painful, and so it is important to inform the patient beforehand, whilst also reassuring them. For example, you might say:
“I will be giving you some medication using a small needle. You will feel a sharp scratch and there may be a little pain, but I will do my best to keep you as comfortable as possible”.
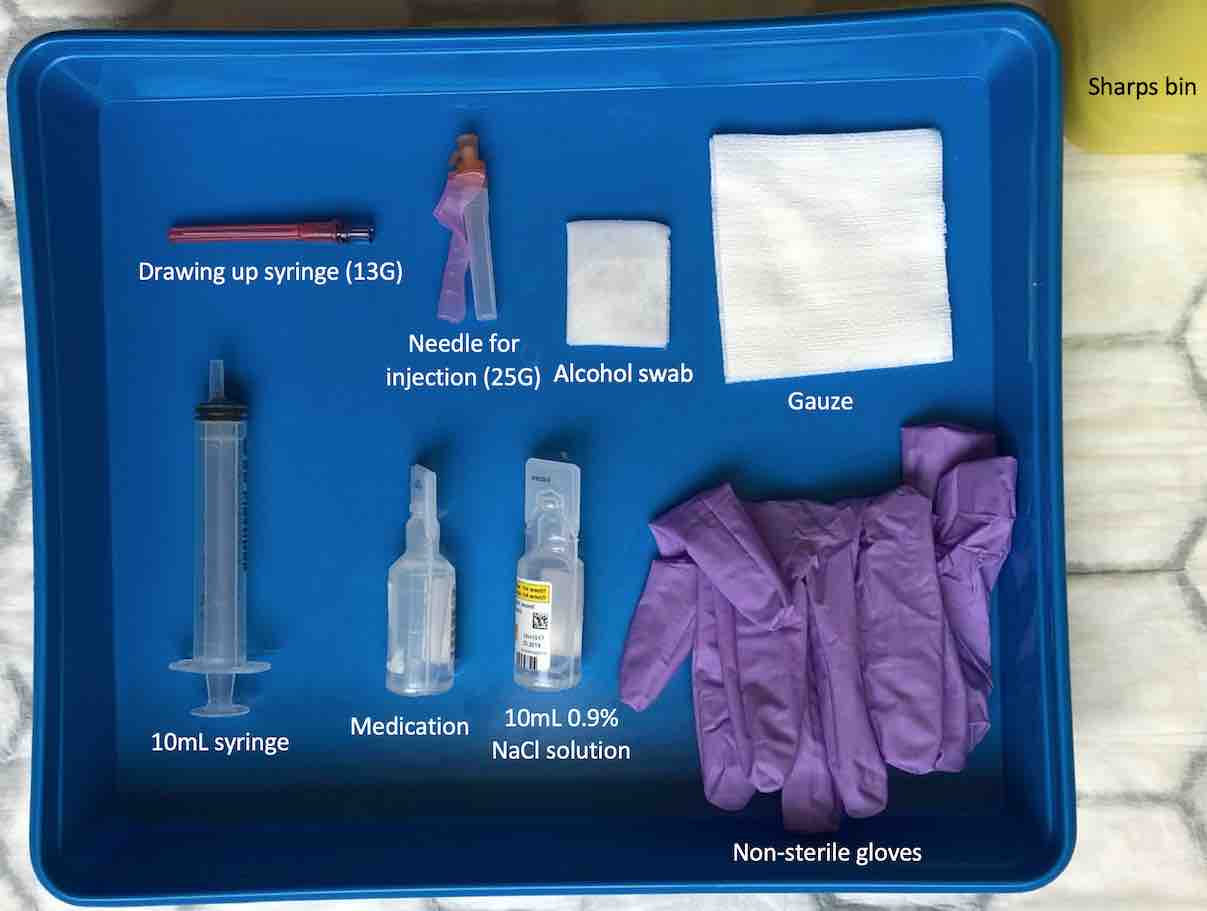
Equipment
Collect a plastic tray, and clean both the inside and outside of the box thoroughly with an alcohol surface disinfectant wipe. You will then need to collect:
2 pairs of non-sterile gloves.
Syringe of appropriate size.
2 drawing up needles (≤18 gauge [18G]).
Injection needle of appropriate size.
Medication and any necessary diluents (e.g. 0.9% sodium chloride solution).
Alcohol swab (2% chlorhexidine in 70% alcohol).
Gauze.
Sharps bin.
Drug chart.
Equipment for injection using an orange (25G) needle.
The needle you use for the injection itself will depend on the route of administration:
Intradermal (25G – orange).
Subcutaneous (25G – orange).
Intramuscular (21G – green OR 23G – blue).
Drawing up needles on the other hand are blunter (lower gauge). Some drawing up needles have a filter to ensure there are no unwanted residues.
Drug preparation
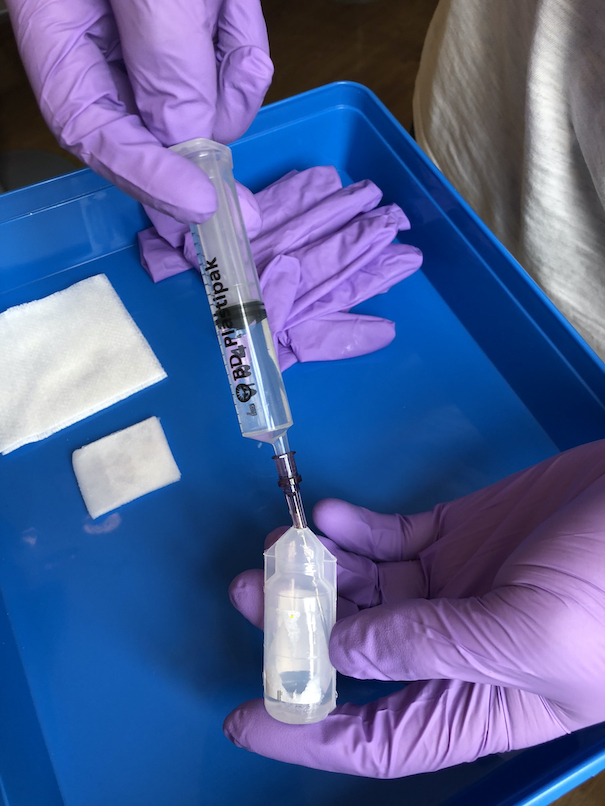
Put on non-sterile gloves. Use a ≤18G needle to draw up medication into a syringe using aseptic non-touch technique.
Draw up your medication.
Remove the drawing up needle and dispose of it directly into a sharps bin. Remove any air in the syringe. Seal the syringe with a fresh, capped drawing up needle. This helps maintain sterility.
Put the prepared medication in to a tray. Replace your non-sterile gloves.
A smaller, 21G needle may be used for medication in glass ampoules or when drawing up through rubber bungs.
Some drugs may need mixing/diluting. Check with the manufacturer guidelines.
Final checks
In the presence of an appropriately qualified colleague, check the following details of the procedure using their prescription drug chart:
Right patient.
Right drug.
Right dose.
Right route of administration.
Right time and date.
Site preparation
Select an appropriate injection site based on the type of injection. If a patient receives regular injections, be sure to rotate the injection site to avoid lumps or fatty deposits forming under the skin. Avoid sites that are inflamed, bruised or scarred.
Expose the injection site appropriately and clean the area using an alcohol swab, then allow the site to dry.
Intradermal (examples include allergy sensitivity testing and the Mantoux test)
Medial surface of the forearm.
Upper back (under the scapula).
Subcutaneous (examples include insulin injections for those with diabetes mellitus)
Abdomen. Avoid a 2cm radius area around the umbilicus because there is less subcutaneous fat, and this leads to slower absorptions rates. The abdomen is the preferred area for low molecular weight heparin injections.
Lateral surface of the arm.
Intramuscular (e.g. vaccinations and administration of adrenaline)
Lateral surface of the deltoid. This is the most common site for vaccinations.
Vastus lateralis muscle. For infants less than 7 months and those unable to walk, the vastus lateralis muscle is recommended. To locate the site, divide the anterior thigh into 3 sections vertically and horizontally (making 9 squares). The injection site is in the lateral middle square.
Ventrogluteal site. The ventrogluteal site is a region on the buttocks which gives access to the gluteus medius muscle. Place the heel of your hand on the greater trochanter of the femur as indicated in the image below. Using your index finger, palpate the anterior superior illiac spine, and whilst keeping the index finger in this position, part your middle finger to form a “V”. Within this “V” is the ventrogluteal site.
Injection
Intradermal
Hold the syringe in your dominant hand. With your free hand stretch the skin taut using your index finger and thumb. Warn the patient of a sharp scratch and insert the needle at a 10-15° angle to a depth of 2-5 mm under the epidermis. Inject up to 0.5ml until a wheal appears under the surface of the skin.
Withdraw the needle and dispose of it directly into sharps bin. Place some gauze on the injection site and apply gentle pressure.
Some people feel more comfortable looking away whilst receiving an injection, so you may wish to suggest this to them.
Subcutaneous
Hold the syringe in your dominant hand. With your free hand pinch a fold of skin between the thumb and index finger to allow better access to subcutaneous tissue. Warn the patient of a sharp scratch and quickly and firmly insert the needle at a 45° angle. Drawback to check for any blood. If no blood is aspirated, inject up to 2ml of medication.
Pinch a fold of sking and inject at 45°.
Withdraw the needle and dispose directly into sharps bin. Place gauze on the injection site and apply gentle pressure. Replace gauze with clean plaster if required.
Some short needles (e.g. insulin needles) need to be inserted at a 90° angle instead.
If there is blood on the drawback, remove the needle and start again, explaining the reason to the patient. This also applies for the intramuscular injection.
Intramuscular
Hold the syringe in your dominant hand between your thumb and index finger, as if you were holding a dart. With your free hand stretch the skin using your index finger and thumb. If a patient is elderly or has reduced muscle bulk however, pinch the skin instead to allow muscle to bunch up. Insert 2/3 of the needle into the muscle firmly at a 90° angle.
Drawback to check for blood. If no blood is aspirated, inject the contents of the syringe slowly at a rate no greater than 1ml per 10 seconds.
Withdraw the needle and dispose of it directly into sharps bin. Place some gauze on the injection site and apply gentle pressure. Observe the site for any inflammation and inform the patient that the site may be sore for a few days.
The z-track method is a common technique used for intramuscular injections to prevent leakage of medication into the subcutaneous tissue underneath the skin. It involves retracting the skin while injecting, and then releasing the retracted skin when withdrawing the needle.
The maximum volume that can be given in an intramuscular injection is dependent on the site. For example, in the relatively thin deltoid muscle, a maximum of 1ml can be given. In the vastus lateralis and at the ventrogluteal site however, a maximum volume of 5ml is permitted.
Completion
Wash hands and dispose of the equipment appropriately. Check the comfort of the patient is comfortable and tell them to go to their general practice if they notice any signs of inflammation including redness, swelling or pain.
Thank the patient and record the name of the medication, the dose and the time the medication was given as well as signing your name in the patient’s drug chart.
Interactive markscheme
When assessing each other, click on each list item as you go along. Doing so will turn the list item green. Make careful note of any steps missed at the end.
We recommend completing any examination or procedure in under 10 minutes, but you can adjust the timer to suit your needs.
:
Introduction “Hello my name is SimpleOSCE and I am a medical student. I have been asked today to give you some medication via an injection. Can I confirm your name and DOB? Thank you.”
Explain the procedure and obtain consent.
Wash your hands.
Ask about allergies (drug/latex) and if the patient had a preferred site of injection.
Gather the correct equipment.
Collect the appropriate needle for procedure.
Check the expiry dates of equipment and medication.
Put on non-sterile gloves.
Prepare your equiprement.
Using an ≤18 gauge needle, draw up medication into a syringe.
Dispose of the drawing up needle in to a sharps bin.
Replace your non-sterile gloves.
Expose the injection site and make the patient comfortable.
Perform the 6 final checks in the presence of colleague (right patient, right drug, right dose, right route of administration, right time and date).
Clean the injection site using an alcohol wipe.
Stretch the skin between your thumb and index finger (intradermal and intramuscular) or pinch the skin (subcutaneous) to prepare the site for injection.
Warn the patient of a sharp scratch
Insert the needle at the correct angle (leaving top third visible in intramuscular).
Aspirate for blood.
Inject the medication, withdraw the needle and apply gauze with gentle pressure.
Dispose of the needle directly in to a sharps bin.