Introduce yourself and confirm the patient’s name and date of birth. Explain the procedure, check the patient’s understanding and obtain consent. Proceed to wash hands.
Preferably, the patient should be seated in a chair so that you have easy access to both sides during the examination. Ask the patient if they are in any pain or discomfort, and offer analgesia if necessary. Check that the light of the otoscope illuminates sufficiently.
Asking the patient if they have had the procedure before can help you determine how much information you need to give them.
Use simple phrases, such as: “this will involve me placing a small device inside your ear so that I can see your eardrum. It might feel slightly uncomfortable but it should not be painful.”
Equipment
Collect the following equipment:
Otoscope.
Disposable otoscope specula.
Clinical waste bin.
General inspection
Start by standing in front of the patient. Ask the patient to smile. Reduced facial movement unilaterally suggests facial nerve paralysis, which can be caused by acute otitis media (middle ear infection).
Check to see if the patient is wearing a hearing aid. If so, ask them to remove it for the duration of the examination.
A middle ear infection can spread to the nearby facial nerve and cause nerve compression. The facial nerve innervates multiple muscles of facial expression, including the zygomaticus major, which facilitates smiling. As a result, asking the patient to smile is a good method of assessing for a compromised facial nerve.
Closer inspection of the pinna
Colour
Stand by one side of the patient and crouch such that your eyes are at the level of their pinna (outer part of the ear).
Inspect the colour of the pinna. Erythema is a sign of ear infection. Carefully inspect the pinna and surrounding skin for skin changes. White, scaly plaques could be actinic keratosis, while erythematous and flaky skin behind the pinna suggests seborrhoeic dermatitis. Also, look for skin lesions indicative of skin cancer, particularly a basal cell carcinoma.
Inspect for surgical scars on the skin surrounding the pinna.
Skin cancers most commonly occur on the face, particularly on the nose and ears, and so in any eyes, nose and throat examination you must be vigilant for skin lesions.
Basal cell carcinoma: Presents as a translucent, pearly nodule with rolled borders and telangiectasia. It can also present as a superficial red plaque. Risk factors include ultraviolet (UV) exposure and old age.
Squamous cell carcinoma: Typically presents as a non-healing ulcer, which could be crusty or scaly. UV exposure and immunosuppression are risk factors.
Malignant melanoma: Presents as a fast growing, irregular, pigmented lesion which may occasionally bleed. There are many types of melanoma, of which the most common is the superficial spreading type. UV exposure and family history of melanoma are both major risk factors. Melanoma is associated with the poorest prognosis of all the main skin cancers.
Inspect the size and shape of the pinna from top to bottom. Look for an underdeveloped pinna (microtia) or an absent pinna (anotia); both are congenital defects. Identify any signs of injury such as swelling secondary to a pinna haematoma. If left untreated, this can lead to a chronic structural deformity such as cauliflower ear. Observe for any ear piercings; these can rarely lead to allergic reactions, skin infections and other skin-related complications.
Look carefully for tophi, white nodules which are usually present on the helix of the pinna and are extra-articular manifestations of gout.
Assess the positioning of the pinna. A low-set pinna is entirely below the horizontal plane of the eyes, and is caused by many genetic disorders, including Down’s syndrome and Turner’s syndrome.
Use the otoscope’s magnifying lens to look for tophi and small cysts. The otoscope’s light can also be helpful to provide extra illumination.
Trauma to the ear can cause the auricular perichondrium to separate from the underlying cartilage. The pinna is very vascular, and hence a haematoma will quickly develop. If this is not drained promptly and subsequent compression applied, the haematoma can cause ischaemia resulting in avasular necrosis of auricular cartilage. Following this there will be new cartilage growth and formation of fibrous tissue. This will affect the shape of the pinna causing it to look more rounded, creating the unpleasing "cauliflower" look.
Closely inspect the entrance to the ear canal for discharge (otorrhoea). Acute bacterial infection produces a white and purulent discharge, while a darker brown discharge is typically due to ear wax.
Otitis externa (external ear inflammation): Also known as “swimmer’s ear.” This is an inflammation of the external auditory canal, usually due to infection with Pseudomonas aeruginosa or Staphylococcus spp. Typically, there is tenderness of the tragus and often a conductive hearing loss.
Otitis media (middle ear inflammation): There are many types of otitis media, the most common of which are acute otitis media and otitis media with effusion.
Acute otitis media is caused by infection, and is a common complication of a viral respiratory illness. The normal functioning of the pharyngotympanic (Eustachian) tube is impaired, increasing the risk of bacterial transit into the middle ear space. The patient will present with a fever, otalgia, conductive hearing loss and a bulging tympanic membrane.
Otitis media with effusion (OME) is a chronic, middle ear inflammation with an effusion, which leads to a fluid build-up behind the tympanic membrane. Also known as “glue ear,” OME is a common cause of hearing loss in children. Whilst not due to infection, OME can commonly follow acute otitis media.
Labyrinthitis (inner ear inflammation): Infection of the labyrinth and vestibular system. It is commonly viral in nature. One of the few painless ear infections, labyrinthitis usually results in vertigo and dizziness.
Palpation
Assess the tragus for tenderness, a classic sign of acute otitis externa.
Palpate the pre-auricular and post-auricular lymph nodes for lymphadenopathy (local infection or metastasis of skin cancer).
Ensure this process is carried out on both ears.
Otoscopy
Positioning the otoscope
Select a sterile speculum which will best fit inside the patient’s external auditory canal.
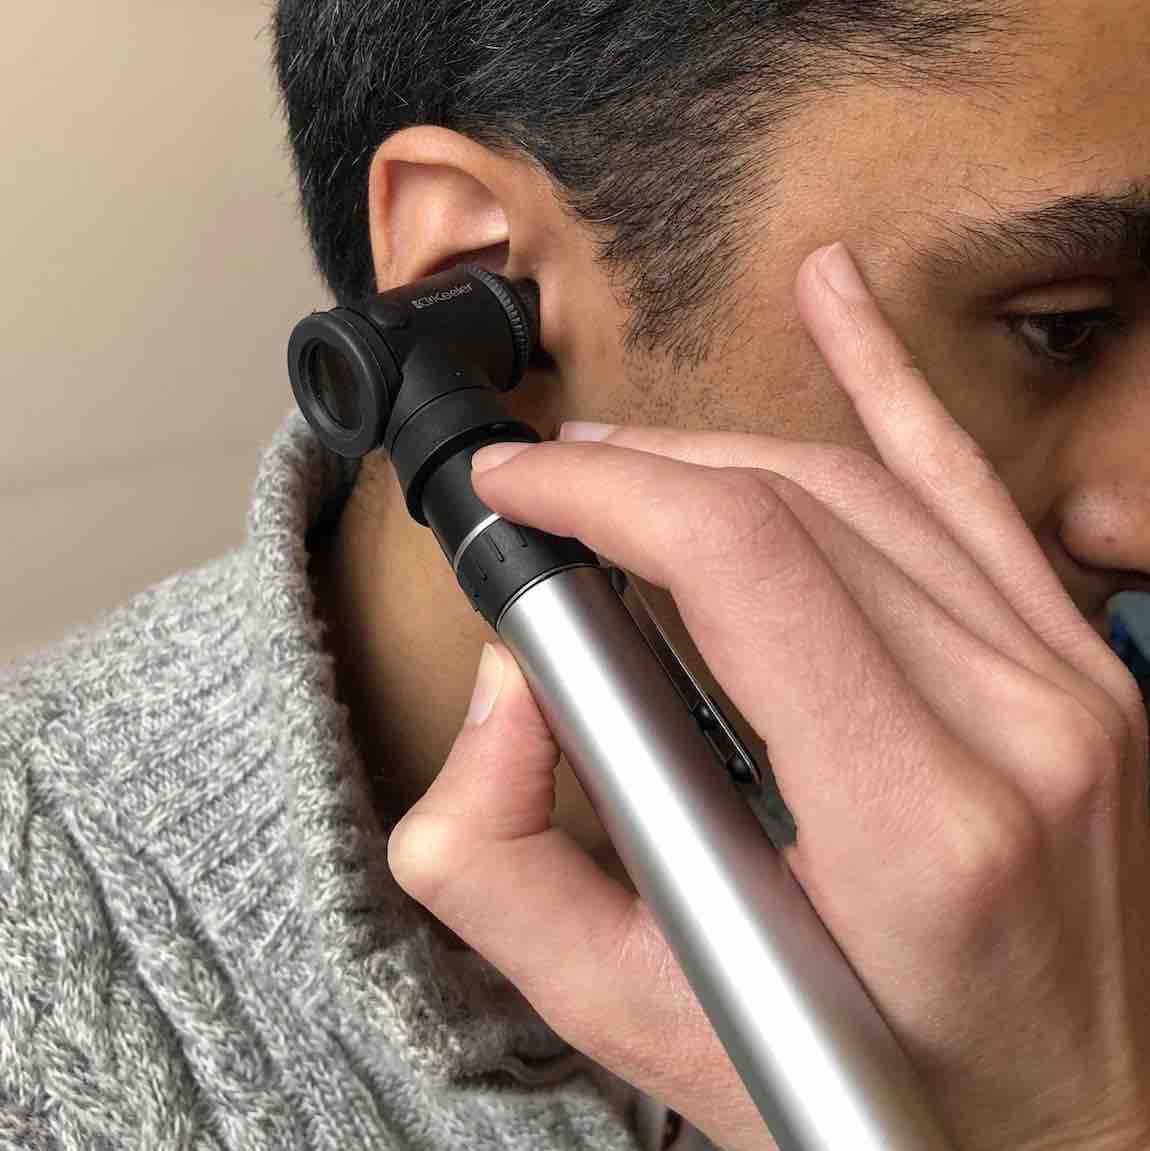
Start by examining the healthier ear. Ask the patient to keep their head as still as possible. Hold the otoscope horizontally between your thumb, index and middle finger (like you would hold a pencil). Grip close to the eyepiece to grant better control.
How to hold the otoscope.
Whilst examining, hold the otoscope like-to-like. For example, when examining the right ear, hold the otoscope in your right hand, whereas when examining left ear, use your left hand.
A common mistake is to insert the full length of the speculum into the patient’s external auditory canal. If you choose a speculum which is sufficiently wide, it will give a good view of the tympanic membrane with minimal insertion into the canal.
Inspection of the external auditory canal
Before inserting the speculum, it is important to straighten the external auditory canal. Its natural curvature obstructs one’s view of the tympanic membrane. Gently pull the pinna backwards and upwards with your free hand. In young children, you should pull the pinna backwards only as the curvature of the pinna differs to adults.
Steadily insert the speculum into the canal, using your little finger as a brace against the patient’s cheek. Look through the viewing window for common causes of conductive hearing loss, such as wax and foreign bodies, the latter being common in children. Inspect the walls for signs of inflammation, such as reddening, discharge and oedema.
A good tip is to rest your little finger along the patient’s cheek, so that if the patient moves their head, your hand and the otoscope will move with it. This will prevent the otoscope striking the fragile wall of the external auditory canal.
Conductive hearing loss occurs in the outer or middle ear, and is due to an obstruction of sound waves, preventing them from entering the inner ear. Causes include excess ear wax, infection and foreign bodies.
Sensorineural hearing loss occurs in the inner ear, and is usually due to damage of the sensory cochlear hair cells. Causes may be congenital (foetal cytomegalovirus infection), genetic (Stickler syndrome) or acquired (ageing).
Advance the speculum slightly forward to increase your view of the tympanic membrane (ear drum). The tympanic membrane should appear pearly-grey and translucent.
The main anatomical landmarks seen on the tympanic membrane.
Identify the two main regions of the tympanic membrane: the pars flaccida (smaller, superior region), and the pars tensa (larger, opaque region in the posterior inferior quadrant).
Identify the lateral process of the malleus bone, which looks like a notch. Identify the handle of the malleus bone, which descends inferiorly and is attached to the tympanic membrane.
Inspect for the light reflex (“cone of light”) in the anterior inferior quadrant of the tympanic membrane. This will be in the 5 o’clock position in the right ear, and in the 7 o’clock position in the left ear. Lack of a light reflex is observed in otitis media.
Remember that the left and right tympanic membranes are mirror images of each other.
Systematic assessment of the tympanic membrane
Assess the tympanic membrane for:
Colour changes: Erythema alludes to infection (most commonly acute otitis media). Whitening of the tympanic membrane is usually due to calcification (tympanosclerosis). A white mass behind the tympanic membrane is indicative of a cholesteatoma (a non-cancerous growth of squamous epithelium).
Shape changes: A bulging, ballooning tympanic membrane is indicative of acute otitis media. A retracted, sunken tympanic membrane is indicative of an upper respiratory tract infection or allergy currently affecting the patient.
Perforations: Note the size and position of any perforation in the tympanic membrane relative to its landmarks. Perforation is usually due to infection, trauma or iatrogenic causes (such as insertion of a tympanostomy tube, which drains fluid from the middle ear).
Patients suffering from an upper respiratory tract infection or allergy may have a blocked Eustachian tube. This results in a negative pressure, which sucks the membrane backwards, causing retraction.
Once complete, replace the speculum and repeat this entire process on the other ear.
Dispose of the used speculums in the clinical waste bin. Thank the patient and wash your hands.
Complete the examination by offering to perform a gross hearing assessment, the Rinne test and the Weber test. Click here to see how to perform these.
Weber test
No lateralisation
Lateralises left
Lateralises right
Rinne test
Both ears AC>BC
Normal
Sensorineural loss in the right ear
Sensorineural loss in the left ear
Left ear BC>AC
Not possible
Conductive loss in the left ear
Mixed loss in the left ear
Right ear BC>AC
Not possible
Mixed loss in the right ear
Conductive loss in the right ear
Key - AC: air conduction. BC: bone conduction.
Mixed hearing loss is defined by the presence of both conductive and sensorineural loss in the same ear.
Interactive markscheme
When assessing each other, please click on each list item as you go along. Doing so will turn the list item green. Make careful note of any steps missed at the end.
We recommend completing any examination or procedure in under 10 minutes, but you can adjust the timer to suit your needs.
:
Introduction: “Hello, I’m SimpleOSCE and I am a medical student. I’ve been asked to examine your ears today. Can I confirm your name and DOB? Thank you.”
Explain procedure and obtain consent: “This will involve me placing a small device inside your ear so that I can see inside it. It might feel slightly uncomfortable but it should not be painful. Would that be okay?”
Wash hands.
Check if the patient is in pain or discomfort
Optional: Test for facial nerve weakness.
Inspect both pinnae for colour changes and shape changes.
Inspect for discharge from the external auditory canals.
Check for tragal tenderness.
Optional: Palpate the pre-auricular and post-auricular lymph nodes.
Attach a sterile speculum to the otoscope.
Examine the healthier ear first
Pull the pinna backwards and upwards.
Inspect the external auditory canal for excess earwax and foreign bodies.
Inspect the walls of the external auditory canal for erythema and oedema.
Identify the pars tensa and pars flaccida.
Identify the malleus bone.
Identify the light reflex.
Assess the tympanic membrane for colour changes and shape changes.
Repeat steps 12-18 on the other ear, using a clean speculum.
Dispose of any used speculums in the clinical waste bin.
Wash hands and thank the patient.
“To conclude, I would like to perform a gross hearing assessment, the Rinne and Weber tests.”


.jpg)
.jpg)


]")


