Introduce yourself and confirm the patient's name and date of birth. Explain the examination, obtain consent and proceed to wash hands.
In order to remember all of the steps of the upper limb examination, we reccommend you use the following mnemonic: Is That Position Really So Cool?
Inspection
General inspection
Begin the examination by asking the patient to sit upright on the side of the bed, or otherwise ask them to lie comfortably with the bed at an angle of 45o. It is important to briefly assess the general appearance of the whole body, and that includes the lower limbs and face. Ensure that the patient is completely exposed from the shoulder to the hand, such that the entire upper limb and muscle groups of the shoulder can be seen.
Ask the patient about pain and comfort. Pain can indicate acute injury or be secondary to pathology. However, we primarily ask about pain to avoid hurting the patient and maximise their comfort. Next, look for paraphernalia around the bed. It is important to look out for walking aids, blood glucose monitors and medication.
Closer inspection
Look for any scarring, rashes, muscle wasting, fasciculation, dyskinesia or tremors. Wasting and fasciculation can be due to a lower motor neurone (LMN) lesion and dyskinesia (involuntary movements) can be caused by a variety of pathologies including Huntington's disease. There are several types of tremor:
Resting tremor: The most common cause of a tremor at rest is Parkinson's disease, in which it is described as "pill-rolling."
Action tremor: This tremor occurs on attempted movement. The acronym BAT can be used to remember the three commonest causes: benign essential tremor syndrome, anxiety, thyrotoxicosis.
Look for deformities such as wrist drop (injury to the radial nerve), waiter's tip (Erb's palsy: injury to the C5-C6 nerve roots), full claw hand (injury to the C8-T1 nerve roots) and medial/ulnar claw hand (injury to the ulnar nerve).
Check for pseudoathetosis (writhing movements), which are a sign of loss of proprioception.
Some students use the mnemonic DWARFST to help remember what to look for in closer inspection. Dyskinesia, wasting, asymmetry, rashes, fasciculation, scars, tremors.
Action tremors are tremors which are intensified by movement. There are over 20 differnt types of action tremor. Examples include:
Benign essential tremor: This is the most common type of tremor. It has an unknown aetiology and strong genetic component. It is typically symmetrical and can involved the hands, head, voice, legs and trunk. Emotion and stress can exacerbate it; it is improved with alcohol and with rest.
Intention tremor:: A type of tremor that appears with target-directed movement. The amplitude of the tremor will increase closer to the target (i.e. the patient’s tremor will become more obvious as their finger gets closer to yours). It is present with cerebellar dysfunction.
Dystonic tremor: Patients with dystonia, a neurological condition in which there are sustained involuntary muscle contractions, may produce a tremor like presentation on attempted movement.
Physiological tremor: Tremor which presents at times of high activation of the sympathetic nervous system. Precipitants include fear, anxiety, nervousness, hyperthyroidism, hypoglycaemia and fever.
To assess tone, assess the muscle groups at the shoulder, elbow and wrist joints, comparing each side like for like. Ensure the patient is relaxed and support their arm and shoulder.
Circumduce the shoulder (glenohumeral) joints. Circumduction assess all of the possible movements at this joint: flexion, extension, abduction, adduction and rotation. Next, flex and extend the elbow joints. If there is any rigidity, carefully assess what type. Finally, pronate, supinate and circumduce the wrists.
Hypotonia: This is usually due to a LMN lesion. Decreased tone is difficult to detect, so caution on presenting. Hypertonia: Hypertonia, or spasticity, can be described in different ways:
Clasp-knife rigidity: This is due to an upper motor neurone lesion. On movement at the elbow joint, initially there will be high resistance. This will be followed by a rapid decrease in resistance where there will be a sudden "give" of the muscle.
Lead-pipe rigidity: This is due to Parkinson's disease. There will be a sustained high resistance to passive flexion at the elbow joint.
Cogwheeling: A jerky resistance to passive movement due to a combination of lead-pipe and tremor. This is also due to Parkinson's and may be detected when circumducing the wrist joint.
Power
Shoulder: Ask the patient to completely flex their elbows and abduct their shoulders to 90o ("please put your arms up like a chicken"). Test the abductors (C5-6) and adductors (C5-7) of the shoulder by applying a downwards and upwards force, while asking the patient to resist. You may also wish to test flexion and extension at the shoulder, however doing so will not test any additional nerve roots.
Elbow: Ask the patient to keep their elbows flexed at roughly 45o, but this time to adduct the shoulder such that the patient's fists are below their chin ("please hold your arms out like a boxer"). Test the elbow flexors (C5-6, musculocutaneous nerve) and extensors (C7, radial nerve) by asking the patient to resist an inward and outward movement.
Wrist: Ask the patient to extend and pronate their elbows, keeping their fists clenched and their wrists at 180o ("please put your arms out like Superman"). Test the wrist flexors (C7-8, median and ulnar nerves) and extensors (C6, radial nerve) by asking the patient to resist an upward and downward movement.
IMPORTANT: It is imperative that during assessment of power you isolate the joints. For example, when assessing extension at the elbow, be sure to push on the patient's biceps to prevent any shoulder flexion.
Additionally, you should be comparing power on each side, like for like.
Be sure to avoid medical jargon when asking patients to perform movements. For example, when assessing power at the elbow joint, while demonstrating, say: "put your hands up like a boxer. Okay - now I am going to pull your forearm towards me, and I want you to stop me from doing so." "Good now, push me away".
Hand
Next, assess the power of the muscles in the hand. Multiple movements can be tested here, however only the following four are necessary:
Digit abduction: Ask the patient to abduct their fingers against resistance. Be sure to use the same fingers as the patients to resist. This will test the dorsal interossei muscles, innervated by the ulnar nerve (T1).
Digit adduction: Ask the patient to hold a piece of paper between any two fingers. Using the same fingers, attempt to pull the paper from the patient and ask them to resist. This will test the palmar interossei muscles, also innervated by the ulnar nerve (C8,T1).
Thumb opposition: Ask the patient to hold their hands with the palmar side face up and the thumbs partially opposed (bring them towards the midline). Use your thumbs to push on theirs in a lateral direction, and ask them to resist you. This isolation exercise will test the opponens pollicis muscle, innervated by the median nerve only.
Pincer grip: Ask the patient to form a pincer grip. Attempt to break this with a pincer grip of your own and ask the patient to resist. This is an important functional grip and the exercise will test both the median and ulnar nerves (C8,T1).
Palmar grip: Ask the patient to squeeze your finger. This is an important functional grip and the exercise will test innervation of the anterior forearm compartment (C7-8, median and ulnar nerves).
Power can be graded using the Medical Research Council (MRC) scale as follows:
0 - No contraction.
1 - Trace of contraction (fasciculation).
2 - Active movement with gravity eliminated.
3 - Active movement against gravity.
4 - Active movement against gravity and resistance.
5 - Normal power.
Decreased power indicates muscle weakness. It is important to identify the pattern of distribution. Weakness at one muscle group could indicate a mononeuropathy. Symmetrical and proximal weakness could be a result of myopathy. If the extensors are weaker than flexors, then there may be hemiparesis. In reporting, focus on the movement affected and the grade of power.
Reflexes
Show the patient the tendon hammer, and proceed to test reflexes. There are three reflexes to elicit.
The biceps reflex (C5-6): Tap the biceps tendon, which is superomedial to the brachial fossa on the anterior aspect of the arm.
The brachioradials reflex (C5-6): Tap the brachioradialis tendon, which is on the lateral aspect of the wrist, approximately 4 inches from the base of the thumb. The easiest way to do this is to ask the patient to pronate/supinate the wrist such that the palm is perpendicular to the ground, and ask the patient to flex their forearm muscles.
The triceps reflex (C7-8): Tap the triceps tendon, which is superior to the olecranon (elbow) joint on the posterior aspect of the arm.
Hyporeflexia: This is usually due to a LMN lesion. The reflex arc involves LMNs in both the afferent and efferent pathways. Hence, if there is a lesion to the LMNs involved in the reflex arc, there will be hyporeflexia.
Hyperreflexia: This is usually due to an upper motor neurone (UMN) lesion. Whilst UMNs are not directly involved in the reflex arc, they exert an inhibitory effect which dampens the reflex response. If there is any lesion to an UMN corresponding to a reflex arc, then this may lead to hyperreflexia.
Sensation
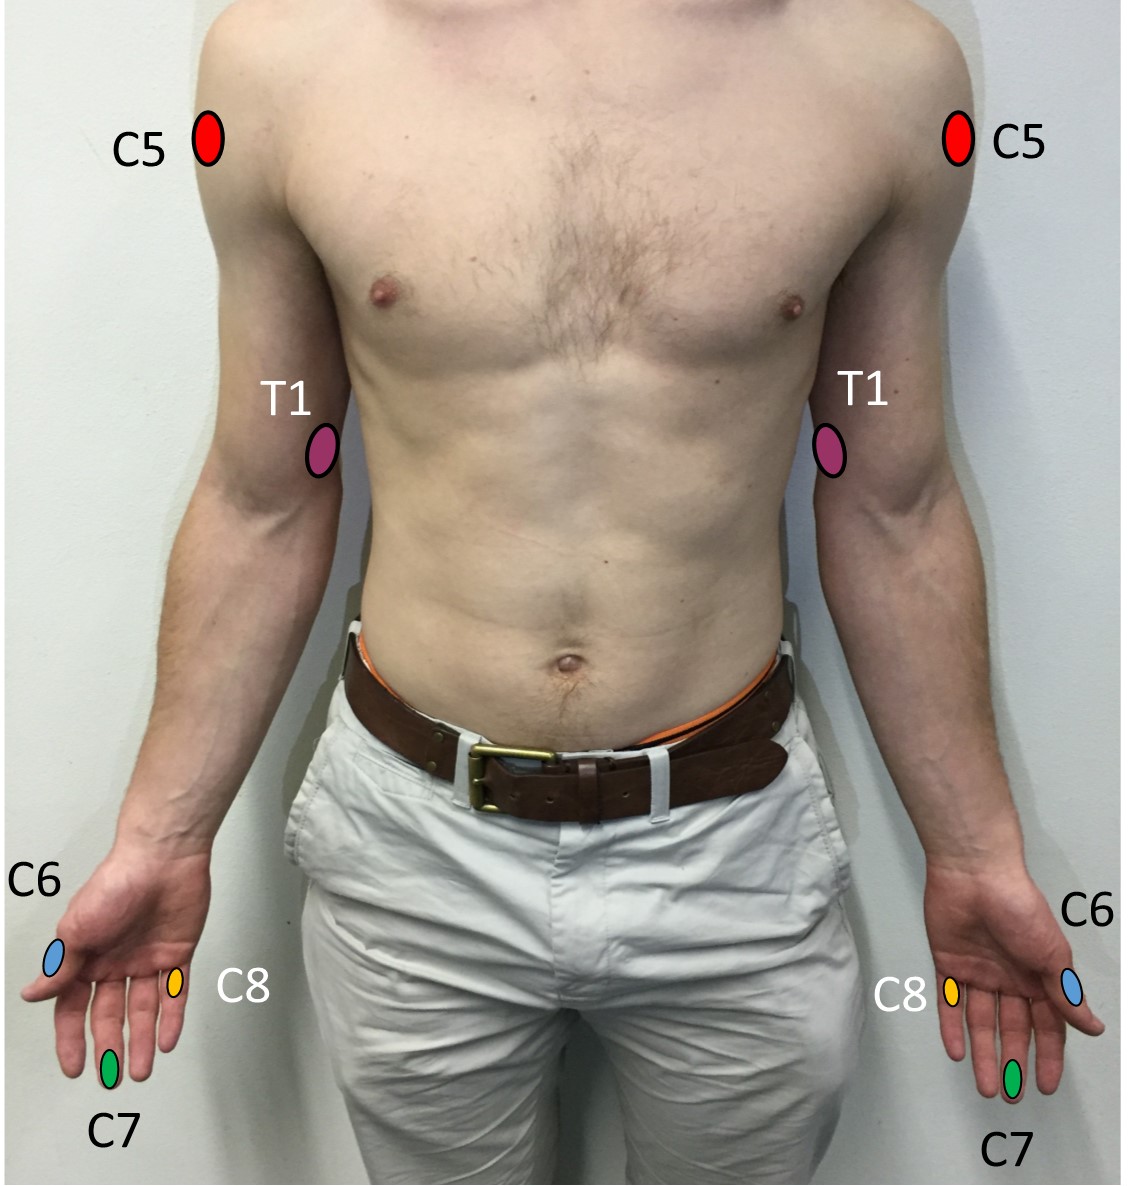
Sensation should be assessed in the distribution of the dermatomes. A dermatome is an area of skin which is supplied by a single spinal nerve root. Below are listed the areas of skin with a single dermatome only.
C5 - On the lateral side of the deltoid muscle, in an area known as the regimental patch.
C6 - On the dorsal surface of the proximal phalanx of the thumb.
C7 - On the dorsal surface of the proximal phalanx of the middle finger.
C8 - On the dorsal surface of the proximal phalanx of the little finger.
T1 - On the medial side of the antecubital fossa, just proximal to the medial epicondyle of the humerus.
Areas of skin with a single dermatome only.
There are five parts to sensation, and they include response to fine touch, pain, temperature change, vibration and joint position. Direct the patient to rest the dorsal aspect of their hands on their knees such that they are sat in the anatomical position, as this will make it easy to assess sensation at each dermatome. It is also important that you ask the patient to close their eyes before assessing any sensation modality.
Light touch is assessed using cotton wool. Lightly press the cotton to the patient's sternum to use as a reference ("calibration") and subsequently assess light touch at each dermatome. Be sure to compare sensation on each side, like for like.
Pain is assessed using a neurotip. A neurotip has a blunt and a sharp end. The patient should be able to distinguish between the two. Demonstrate the difference on the patient's sternum and proceed to assess pain sensation at each dermatome with an unpredictable pattern of sharp and blunt touches.
Temperature is assessed with the use of hot and cold test tubes. Again, demonstrate the difference on the sternum and proceed to assess each dermatome systematically in a similar, unpredictable way as before. It is unlikely that you will be required to do this in any OSCE scenario, however it is important to be aware of the proper procedure.
Vibration sense is assessed using a 128Hz tuning fork. Place the vibrating tuning fork on the sternum and ask the patient when the vibration stops (manually stop the vibration yourself to save time). Proceed to do the same at the interphalangeal joint of the thumb. If the patient cannot accurately determine the presence or absence of vibration then continue to sequentially assess at the metacarpophalangeal joint of the thumb, the wrist joint and the lateral epicondyle of the humerus until you are confident that vibration sense is detected.
Joint position, or proprioception is also assessed at the interphalangeal joint of the thumb. Flex and extend the joint with the patient watching and indicate which way is "up" and "down". Manipulate the joint with the patient's eyes closed and eventually stop in the "up" or down" position. Ask the patient to say which position the thumb is in and repeat this thrice. If the patient is unable to accurately determine joint position at the interphalangeal joint of the thumb, then, just like with vibration sense, proceed to test proximally at the metacarpophalangeal joint of the thumb, the wrist joint and the elbow joint.
Dorsal columns-medial lemniscus pathway: Light touch, vibration sense and proprioception in the upper limb are communicated to the midbrain via the cuneate fasciculus of the dorsal columns in the spinal cord. Information then travels via the medial lemniscus to the contralateral thalamus before communicating with the primary somatosensory cortex.
Spinothalamic tract: Light touch, pain and temperature sensation are communicated directly to the thalamus via the contralateral spinothalamic tract of the spinal cord.
Light touch is in fact the least useful modality to assess sensation with because whilst it is mainly communicated to the brain by the dorsal columns-medial lemniscus pathway there is also communication in the spinothalamic tract.
If there is loss of sensation at a particular dermatome, this suggests injury to the spinal root, as a dermatome is a patch of skin supplied by a single spinal root.
If there is a loss of sensation in a non-dermatomal distribution, this indicates injury to the peripheral nerves, causing a peripheral neuropathy.
Mononeuropathy: This is where there is a lesion to a single peripheral nerve. For example, in carpal tunnel syndrome, the median nerve is compressed, and there is sensory loss to the lateral aspect of the palmar surface of the hand.
Polyneuropathy: This is where there are lesions to multiple peripheral nerves. Polyneuropathies are often symmetrical to the left and right sides and often start distally moving more proximally. In diabetes mellitus for example, there can be a loss of sensation in the hands and feet in a "glove and stocking" distribution. Other causes of polyneuropathy include alcohol abuse (due to a deficiency of vitamin B1 [thiamine]), or a deficiency of vitamin B12.
Coordination
Ask the patient to place their right palm on top of the left. Next, instruct them to repeatedly flip their right hand at an increasing pace. After about 5 seconds of continual movement ask them to do the same with the left hand. This exercise tests for dysdiadochokinesia, which is indicative of a cerebellar lesion.
Then test for past pointing. Ask the patient to touch their index finger to their nose. Hold your own finger at an arm's length distance away and instruct the patient to touch your index finger with theirs, before touching their nose once again. Ask them to repeat this motion with both hands. This will test for dysmetria, a phenomenon also indicative of cerebellar pathology.
Dysdiadochokinesia is a term for the inability to perform rapid alternating movements. It is a feature of cerebellar ataxia. Dysmetria is a term for a lack of coordination movement when there is purposeful movement, that is to say, when there is undershoot or overshoot when trying to reach a certain position. Dysmetria is also a feature of cerebellar ataxia
Optional: Pronator drift
Ask the patient to hold their arms fully extended in front of them, palms facing upwards, and observe. If they can maintain this position without pronating their arms, ask them to close their eyes, and observe once again. If there is pronation at any point during this exercise, the patient is positive for pronator drift. Pronator drift is indicative of upper motor neurone pathology. When the eyes are closed, the body is entirely reliant on proprioception only, and therefore pronation is more likely to show, if there is indeed a lesion.
Completion
Complete the examination by offering to obtain a full history, perform an lower limb and cranial nerve examination and then, if appropriate, suggest further tests such as nerve conduction studies (if nerve damage is suspected), a CT scan (if a recent stroke is suspected) or an MRI scan (if a demyelinating disorder is suspected).
Interactive markscheme
When assessing each other, please click on each list item as you go along. Doing so will turn the list item green. Make careful note of any steps missed at the end.
We recommend completing any examination or procedure in under 10 minutes, but you can adjust the timer to suit your needs.
:
Introduction: “Hello, I’m SimpleOSCE and I am a medical student. I need to examine and test the nerves in your arms today, would that be okay? Can I confirm your name and DOB? Thank you.”
Wash hands.
Position the patient on the end of the bed and ensure adequate exposure.
Ask about pain and discomfort.
General inspection of the face, lower limbs and around the bed (walking aids, medication)
Closer inspection of the upper limbs for scarring, rashes, wasting, fasciculation, dyskinesia or tremor.
Check tone at the shoulder, elbow and wrist joints.
Check power at the shoulder, elbow and wrist joints. Check digit abduction and adduction, pincer and power grips.
Ask the patient to relax and elicit the biceps, triceps and brachioradialis reflexes. Attempt to do this twice per muscle only.
Check light touch sensation at all dermatomes with cotton wool (dorsal columns/spinothalamic).
Demonstrate sensation first on sternum and ensure patient's eyes are closed throughout.
Offer to check pain with neurotip (spinothalamic).
Offer to check temperature with hot and cold test tubes (spinothalamic).
Test proprioception by moving the thumb at the interphalangeal (IP) joint (dorsal column).
Test vibration sense using the 128Hz tuning fork at the IP joint of the thumb (dorsal column).
Test for dysmetria by past pointing.
Use hand turning exercise to check for dysdiadochokinesia.
(Optional): check for pronator drift.
"To complete my exam, I would like to take a full history and perform a lower limb neurological examination as well as a cranial nerve examination."
_(14592407537).jpg)